
Automatic Open Source-based Data Pipelines? Openshift To the Rescue!
Kubernetes is our new Operating System, no one can doubt that anymore. As a lot of effort has been made, in order to develop a micro-services approach, and migrate workloads towards Kubernetes, organizations left their data services behind.
We all saw, due to COVID-19, how important data is, and how important it is to have the proper architecture and data fabric. Data won’t stop from growing! more even, it’ll just keep breaking its consumption records one year after the other.
This challenge forces us to provide a more automatic, and scalable solution to our organization by moving our data services to Kubernetes, where all the magic happens. Kubernetes offers Operators that will help you manage both day-1 and day-2 operations, using health checks, state preserving, auto-pilots, etc.
In this demo, I’d like to show you how you can run your automatic data pipelines, using Operators that are offered in every Openshift installation via the Operator Hub. I chose to take Real-Time BI as a use case, and build this demo around it. This demo leverages Openshift’s mechanisms, in order to create scalable, Kubernetes-based data pipelines and uses all the de-facto standard products in order to fulfill those requirements. All Operators will be deployed on an Openshift 4 cluster, while Openshift Container Storage will provide the underlying storage solution for both Object and Block storage protocols.
This demo deploys a music streaming application, that generates events based on users’ behavior (will be explained further).
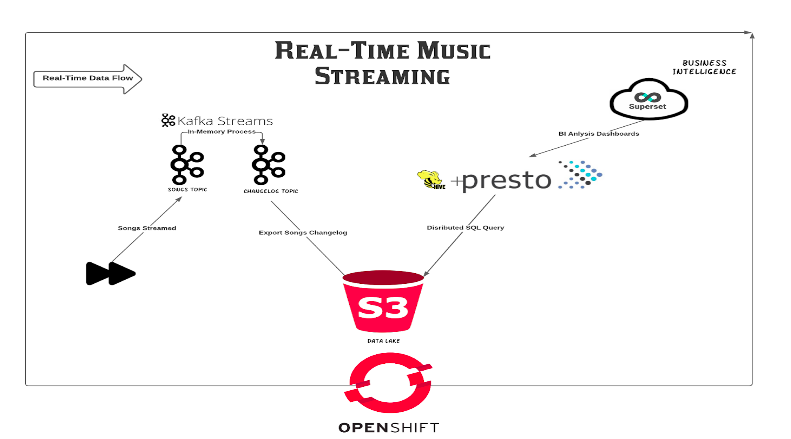
Using that data that is being generated, we can use Open Source tools in order to create our dashboards and visualizations, and provide our stakeholders so as our data scientists a more reliable way to visualize important data.
THIS AFFECTS BUSINESS LOGIC DIRECTLY!
Now that the message is clear, let’s start playing!
Prerequisites
- A running Ceph Cluster (> RHCS4)
- A running Openshift 4 cluster (> 4.6.8)
- An OCS cluster, in external mode, to provide both Object and Block storage
Installation
Create a new project in your Openshift cluster, where all resources should be deployed:
$ oc new-project data-engineering-demo
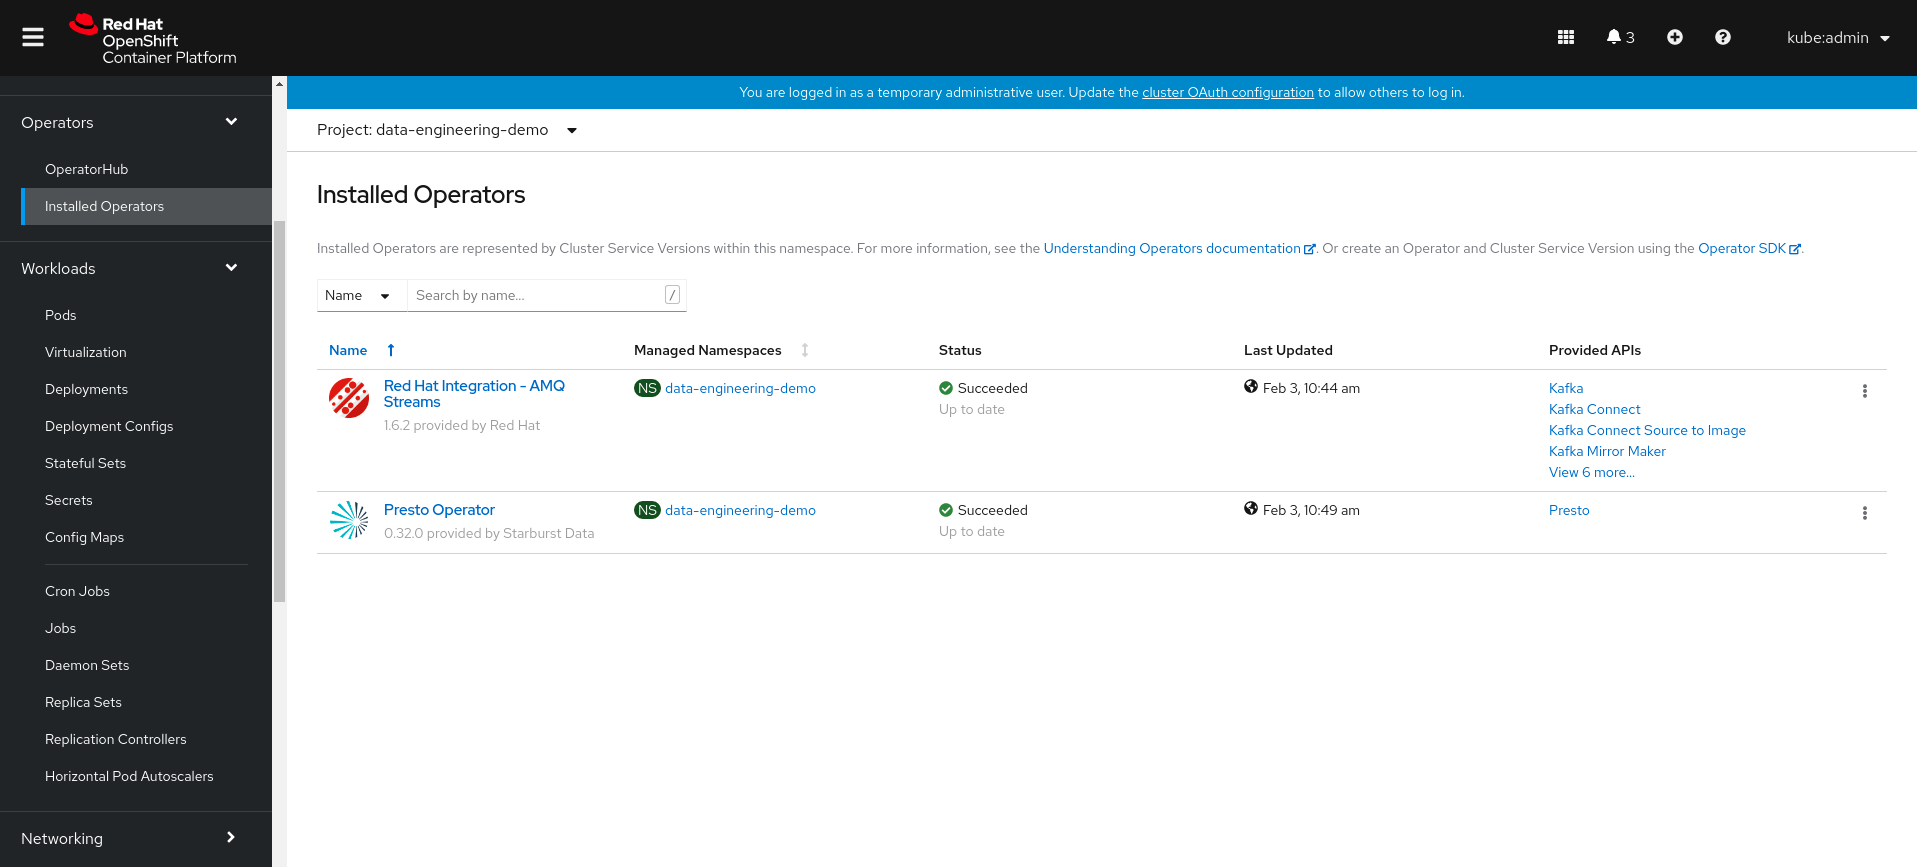
Install both AMQ Streams and Presto Operators, as we’ll need those to create our relevant resources. go the the Operator Hub section on the left panel to install:
Clone the needed git repository so you’ll be able to deploy the demo:
$ git clone https://github.com/shonpaz123/cephdemos.git
Change your directory into the demo directory, where all manifests are located:
$ cd cephdemos/data-engineering-pipeline-demo-ocp
Data Services Preparation
Preparing our S3 environment
Now that we have all the prerequisites ready, let’s start by creating our needed S3 resources. As we are using an external Ceph cluster, we should create the needed S3 user in order to interact with the cluster. Additionally, we need to create an S3 bucket so that Kafka could export our events to the data lake. Let’s create those resources:
$ cd 01-ocs-external-ceph && ./run.sh && cd ..
The expected output:
{
    "user_id": "data-engineering-demo",
    "display_name": "data-engineering-demo",
    "email": "",
    "suspended": 0,
    "max_buckets": 1000,
    "subusers": [],
    "keys": [
        {
            "user": "data-engineering-demo",
            "access_key": "HC8V2PT7HX8ZFS8NQ37R",
            "secret_key": "Y6CENKXozDDikJHQgkbLFM38muKBnmWBsAA1DXyU"
        }
    .
    .
    .
}
make_bucket: music-chart-songs-store-changelog
The script uses awscli in order to export our credentials as environment variables, so that we’ll be able to create the bucket properly. Make sure that you have access to your endpoint URL with all the open ports so that this script will work properly.
Deploying Kafka new-ETL
Now that we have our S3 ready, we need to deploy all the needed Kafka resources. In this section we’ll deploy a Kafka cluster, using the AMQ Streams operator, that is offered via the Openshift Operator Hub. Additionally, we’ll deploy Kafka Topics and Kafka Connect as well, in order to export all of the existing topic events to our S3 bucket. Important! make sure that you change the endpoint URL to suit yours, or else Kafka Connect will try to expose the events with no success.
Run the script in order to create those resources:
$ cd 02-kafka && ./run.sh && cd ..
Now let’s verify all pods were successfully created:
$ oc get pods
NAME                                                  READY   STATUS    RESTARTS   AGE
amq-streams-cluster-operator-v1.6.2-5b688f757-vhqcq   1/1     Running   0          7h35m
my-cluster-entity-operator-5dfbdc56bd-75bxj           3/3     Running   0          92s
my-cluster-kafka-0                                    1/1     Running   0          2m10s
my-cluster-kafka-1                                    1/1     Running   0          2m10s
my-cluster-kafka-2                                    1/1     Running   0          2m9s
my-cluster-zookeeper-0                                1/1     Running   0          2m42s
my-connect-cluster-connect-7bdc77f479-vwdbs           1/1     Running   0          71s
presto-operator-dbbc6b78f-m6p6l                       1/1     Running   0          7h30m
We see that all pods are in a running state and passed their probes, so let’s verify we have the needed topics:
$ oc get kt
NAME                                                          CLUSTER      PARTITIONS   REPLICATION FACTOR
connect-cluster-configs                                       my-cluster   1            3
connect-cluster-offsets                                       my-cluster   25           3
connect-cluster-status                                        my-cluster   5            3
consumer-offsets---84e7a678d08f4bd226872e5cdd4eb527fadc1c6a   my-cluster   50           3
music-chart-songs-store-changelog                             my-cluster   1            1
played-songs                                                  my-cluster   12           3
songs                                                         my-cluster   12           3
Those topics will be used by our streaming application to receive, transform and export those events with the proper format, into our S3 bucket. In the end, topic music-chart-songs-store-changelog will hold all the information with its final structure, so that we’ll be able to query it.
Running Presto for Distributed Querying
In this demo, we’ll use Presto’s ability to query S3 bucket prefixes (similar to tables in relational databases). Presto needs a schema to be created, in order to understand what is the file structure that it needs to query, in our example, all events that are being exported to our S3 bucket will look like the following:
{"count":7,"songName":"The Good The Bad And The Ugly"}
Each file will be exported with a JSON structure, that holds two key-value pairs. To emphasize, you can think of it as a table, with two columns where the first one is count and the second is songName, and all files that are being written to the bucket are just rows with this structure.
Now that we have a better understanding of our data structure, we can deploy our Presto cluster. This cluster will create a hive instance to store the schema metadata (with Postgres to store the schema information), and a Presto cluster that contains the coordinator and worker pods. All of those resources will be automatically created by the Presto Operator, which is offered as part of the Openshift Operator Hub as well.
Let’s run the script to create those resources:
$ cd 04-presto && ./run.sh && cd ..
Now let’s verify all pods were successfully created:
$ oc get pods | egrep -e "presto|postgres"
NAME                                                  READY   STATUS    RESTARTS   AGE
hive-metastore-presto-cluster-576b7bb848-7btlw        1/1     Running   0          15s
postgres-68d5445b7c-g9qkj                             1/1     Running   0          77s
presto-coordinator-presto-cluster-8f6cfd6dd-g9p4l     1/2     Running   0          15s
presto-operator-dbbc6b78f-m6p6l                       1/1     Running   0          7h33m
presto-worker-presto-cluster-5b87f7c988-cg9m6         1/1     Running   0          15s
Visualizing real-time data with Superset
Superset is a visualization tool, that can present visualization and dashboards from many JDBC resources, such as Presto, Postgres, etc. As Presto has no real UI that provides us the ability to explore our data, controlling permissions, and RBAC, we’ll use Superset.
Run the script in order to deploy Superset in your cluster:
$ cd 05-superset && ./run.sh && cd ..
Now verify all pods were successfully created:
$ oc get pods | grep superset
superset-1-deploy                                     0/1     Completed   0          72s
superset-1-g65xr                                      1/1     Running     0          67s
superset-db-init-6q75s                                0/1     Completed   0          71s
Nice! all went well!
Data Logic Preparation
After we have all of our infrastructure services ready, we need to create the data logic behind our streaming application. As Presto queries data from our S3 bucket, we need to create a schema, that will allow Presto to know how it should query our data, so as a table to provide the structure knowledge.
Login to your Presto Coordinator node:
$ oc rsh $(oc get pods | grep coordinator | grep Running | awk '{print $1}')
Change your context to work with the hive catalog:
$ presto-cli --catalog hive
Create a schema, that’ll tell Presto to use the s3a connector in order to query data from our S3 bucket prefix:
$ CREATE SCHEMA hive.songs WITH (location='s3a://music-chart-songs-store-changelog/music-chart-songs-store-changelog.json/');
Change the schema context, and create a table:
$ USE hive.songs;
$ CREATE TABLE songs (count int, songName varchar) WITH (format = 'json', external_location = 's3a://music-chart-songs-store-changelog/music-chart-songs-store-changelog.json/');
Pay attention! creating the table provides Presto the actual knowledge of each file’s structure, as we saw in the previous section. Now let’s try to query our S3 bucket:
$ select * from songs;
 count | songname
-------+----------
(0 rows)Query 20210203_162730_00005_7hsqi, FINISHED, 1 node
Splits: 17 total, 17 done (100.00%)
1.01 [0 rows, 0B] [0 rows/s, 0B/s]
We have no data, and it’s OK! we haven’t started streaming any data, but we see that we get no error, which means Presto can access our S3 service.
Streaming Real-Time Events
Now that all resources are ready to use, we can finally deploy our streaming application! Our streaming application is actually a Kafka producer that simulates a media player, it has a pre-defined list of songs that are being randomly “played” by our media player. Each time a user plays a song, the event is being sent to a Kafka topic.
Then, we’re using Kafka Streams, in order to transform the data to our wanted structure. Streams will take each event that is being sent to Kafka, transform it, and write it to another topic, where it’ll be automatically exported to our S3 bucket.
Let’s run the deployment:
$ cd 03-music-chart-app && ./run.sh && cd ..
Let’s verify all pods are running, the player-app pod is our media player, while the music-chart pod is actually a pod that holds all the Kafka Streams logic:
$ oc get pods | egrep -e "player|music"
music-chart-576857c7f8-7l65x                          1/1     Running     0          18s
player-app-79fb9cd54f-bhtl5                           1/1     Running     0          19s
Let’s take a look at the player-app logs:
$ oc logs player-app-79fb9cd54f-bhtl52021-02-03 16:28:41,970 INFO  [org.acm.PlaySongsGenerator] (RxComputationThreadPool-1) song 1: The Good The Bad And The Ugly played.
2021-02-03 16:28:46,970 INFO  [org.acm.PlaySongsGenerator] (RxComputationThreadPool-1) song 1: The Good The Bad And The Ugly played.
2021-02-03 16:28:51,970 INFO  [org.acm.PlaySongsGenerator] (RxComputationThreadPool-1) song 2: Believe played.
2021-02-03 16:28:56,970 INFO  [org.acm.PlaySongsGenerator] (RxComputationThreadPool-1) song 3: Still Loving You played.
2021-02-03 16:29:01,972 INFO  [org.acm.PlaySongsGenerator] (RxComputationThreadPool-1) song 2: Believe played.
2021-02-03 16:29:06,970 INFO  [org.acm.PlaySongsGenerator] (RxComputationThreadPool-1) song 7: Fox On The Run played.
We see that we have the data being written randomly, each time a song is being played, an event is being sent to our Kafka topic. Now, let’s take a look at our music-chart logs:
$ oc logs music-chart-576857c7f8-7l65x [KTABLE-TOSTREAM-0000000006]: 2, PlayedSong [count=1, songName=Believe]
[KTABLE-TOSTREAM-0000000006]: 8, PlayedSong [count=1, songName=Perfect]
[KTABLE-TOSTREAM-0000000006]: 3, PlayedSong [count=1, songName=Still Loving You]
[KTABLE-TOSTREAM-0000000006]: 1, PlayedSong [count=1, songName=The Good The Bad And The Ugly]
[KTABLE-TOSTREAM-0000000006]: 6, PlayedSong [count=1, songName=Into The Unknown]
[KTABLE-TOSTREAM-0000000006]: 3, PlayedSong [count=2, songName=Still Loving You]
[KTABLE-TOSTREAM-0000000006]: 5, PlayedSong [count=1, songName=Sometimes]
[KTABLE-TOSTREAM-0000000006]: 2, PlayedSong [count=2, songName=Believe]
[KTABLE-TOSTREAM-0000000006]: 1, PlayedSong [count=2, songName=The Good The Bad And The Ugly]
We see that data is being transformed successfully, and that the count number increases as users play more songs.
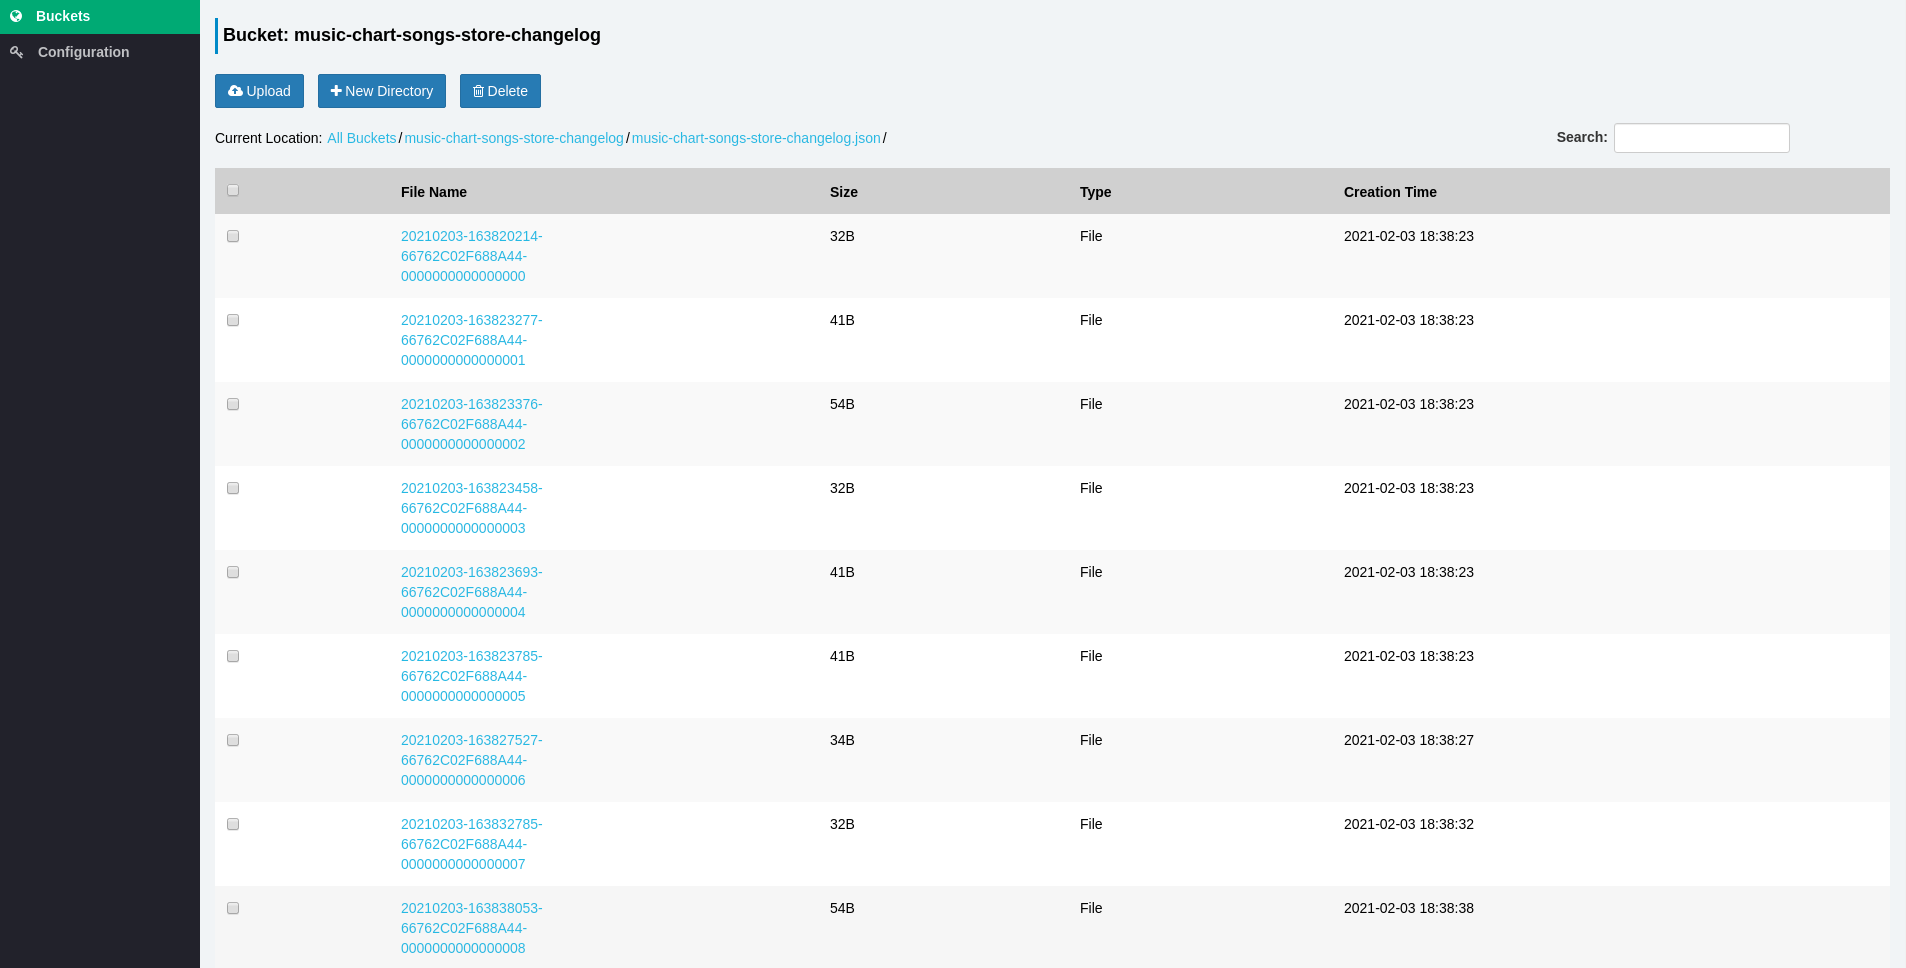
Now, we need to make sure our pipeline works, so let’s go the our S3 service to verify all events are being exported successfully. for this purpose, I’ve used Sree as the S3 browser. Make sure you’re using the right credentials and endpoint URL:
Let’s go back to our Presto coordinator pod and try to query our data again:
$ presto> presto-cli --catalog hive
$ presto:songs> USE hive.songs;
Run the SQL query in order to fetch our data:
$ select * from songs;
 count |           songname
-------+-------------------------------
     1 | Bohemian Rhapsody
     4 | Still Loving You
     1 | The Good The Bad And The Ugly
     3 | Believe
     1 | Perfect
     1 | Sometimes
     2 | The Good The Bad And The Ugly
     2 | Bohemian Rhapsody
     3 | Still Loving You
     4 | Sometimes
     2 | Into The Unknown
     4 | Believe
     4 | Into The Unknown
     2 | Sometimes
     5 | Still Loving You
     3 | The Good The Bad And The Ugly
Amazing! We see that our data is being updated automatically! try running this command a few more times, and you’ll see that the number of rows grows. Now, in order to start visualizing our data, look for the Superset route, where you’ll be able to login to the console:
$ oc get routeNAME       HOST/PORT                                            PATH   SERVICES   PORT       TERMINATION   WILDCARD
superset   superset-data-engineering-demo.apps.ocp.spaz.local          superset   8088-tcp                 None
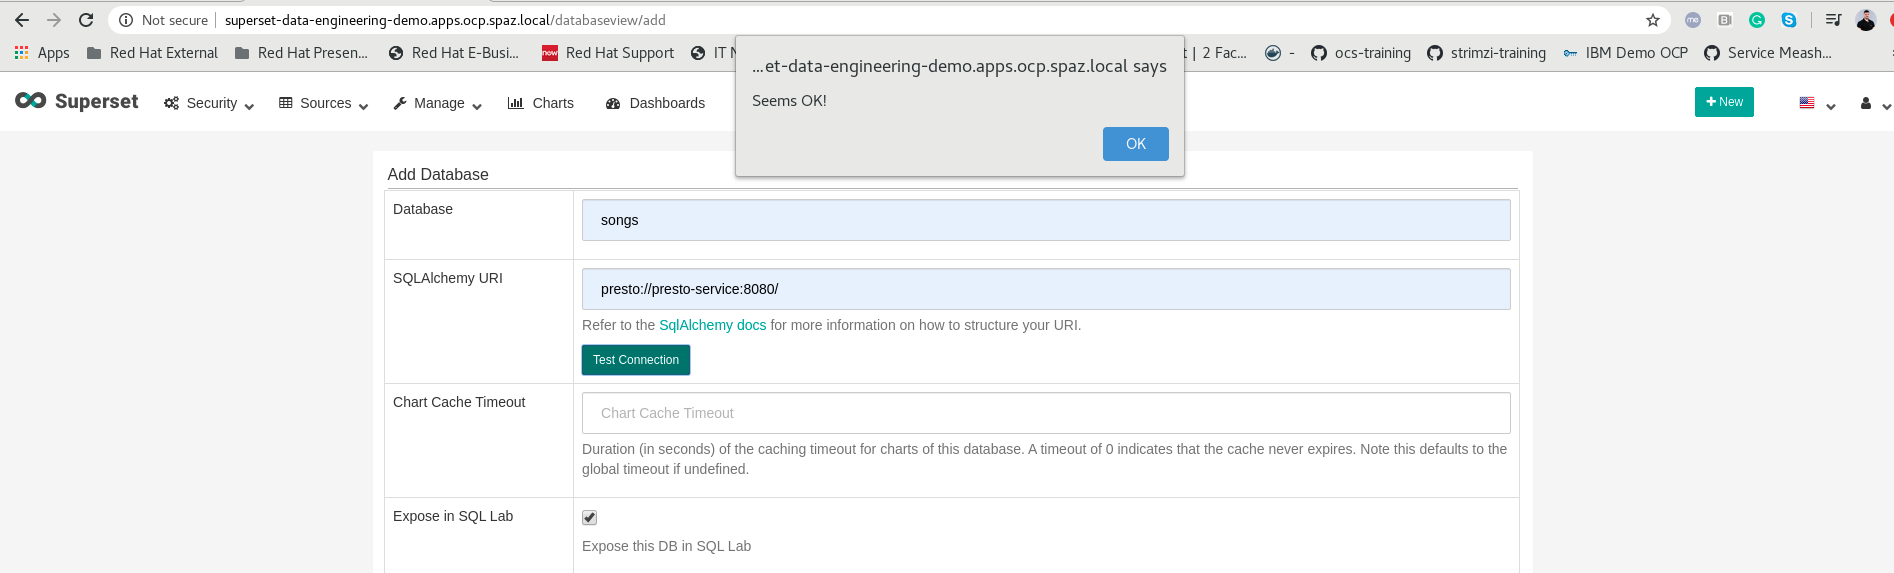
When we reach our Superset console (login with admin:admin), we can see that we can go to Manage Databases –> Create Database to create our Preto connection, make sure you put your Presto’s ClusterIP service name, at the end make sure you test your connection:
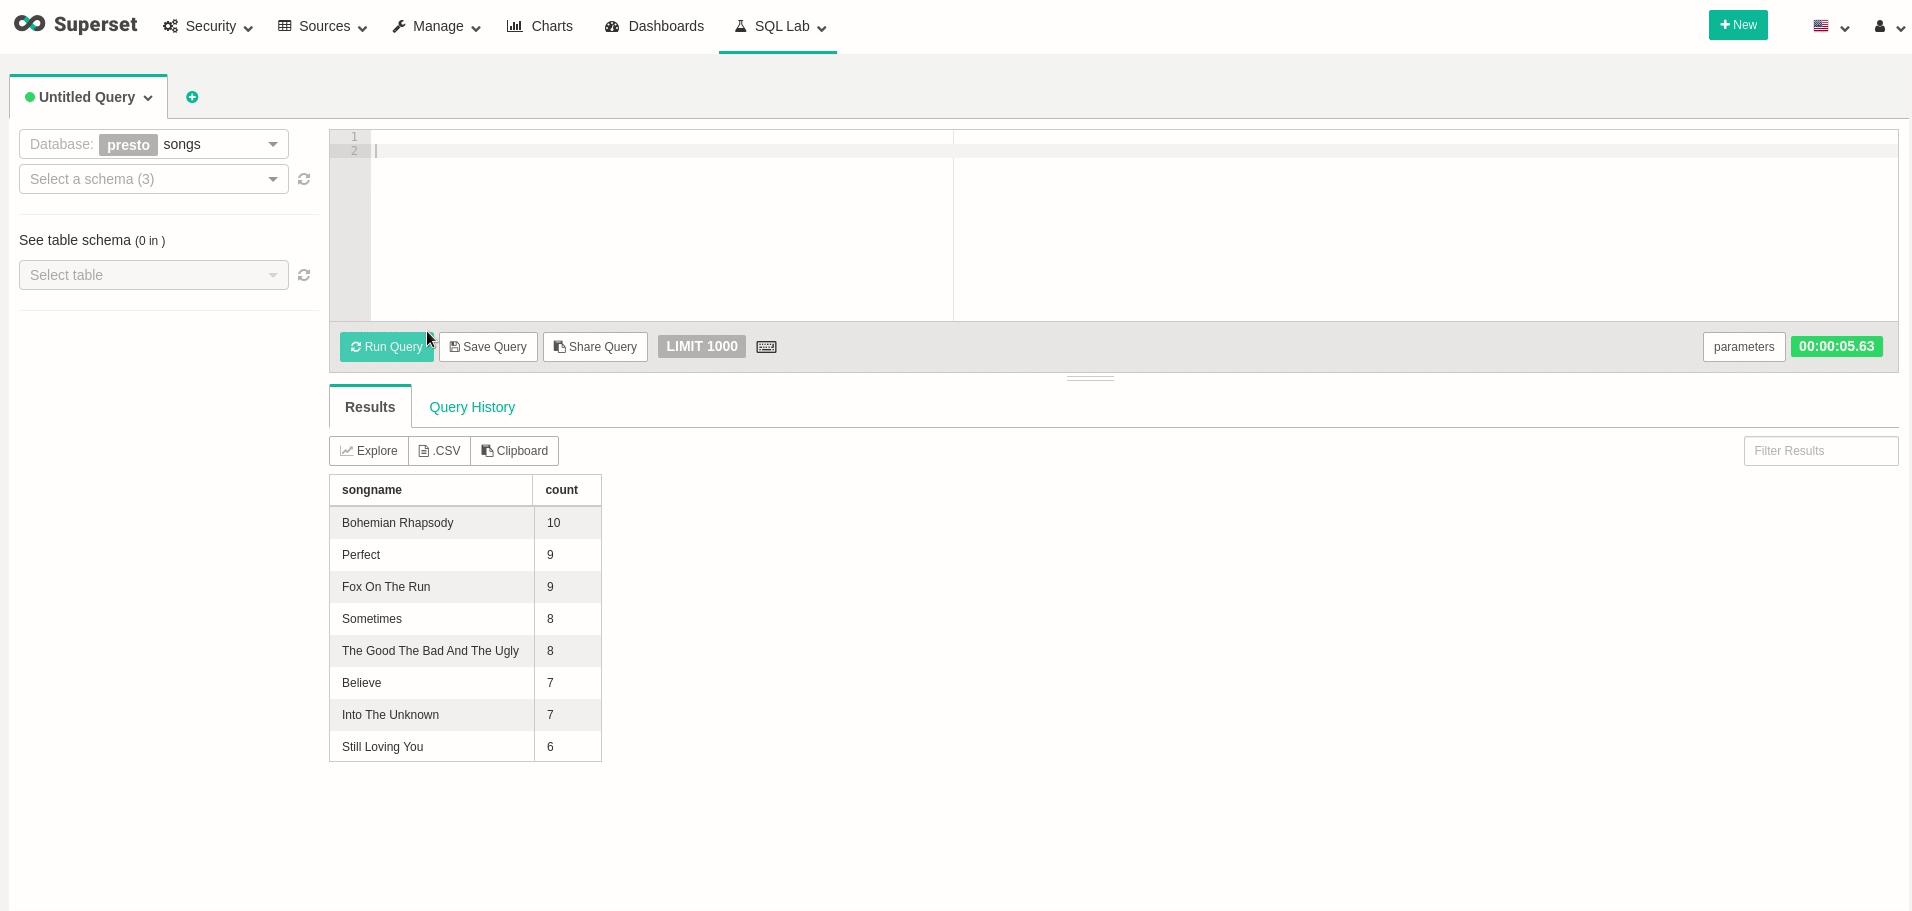
Now that we can have a more convenient way to query our data, let’s try exploring our data a bit. Go to SQL Lab, and see that you can perform our previous query. To emphasize, watch the following query, that will show how many times each song has been played:
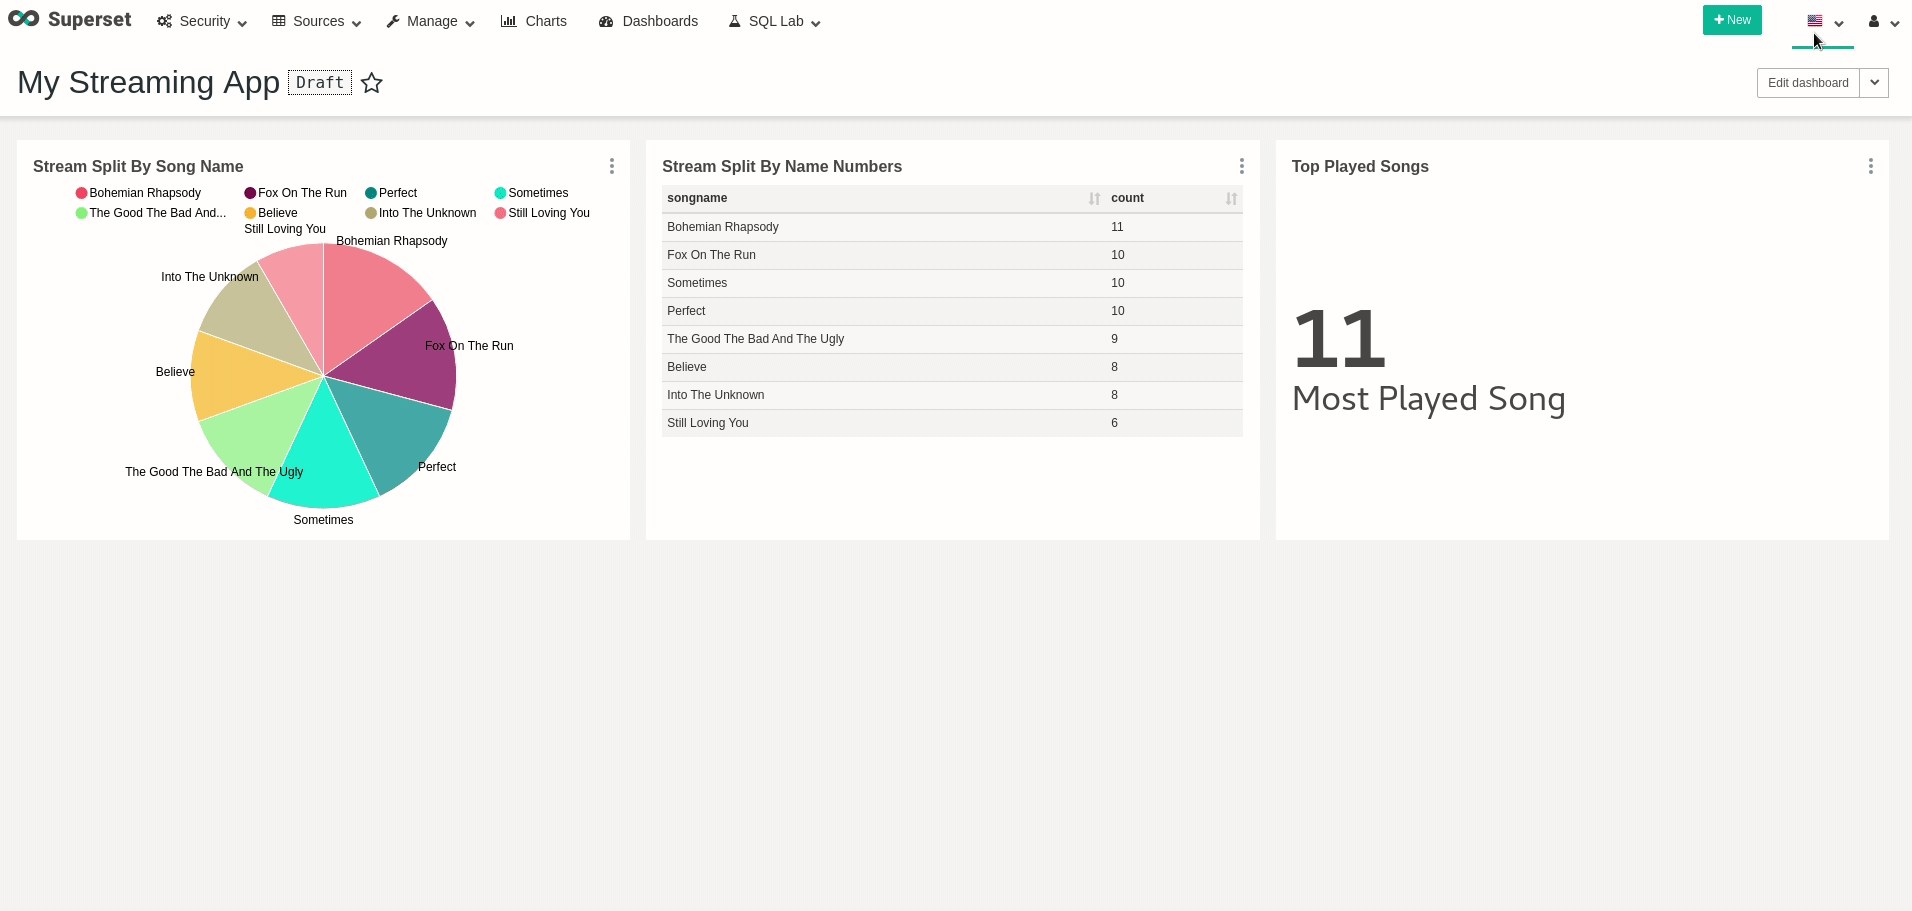
Good! we can query data! feel free to create all your wanted visualizations and dashboards. As an example, I’ve created a dashboard that changes in real-time, as every refresh to the dashboard actually queries all the data from Presto once again:
Conclusion
In this demo, we saw how we can leverage Open Source products in order to run automatic data pipelines, all scheduled on Openshift. As Kubernetes breaks the records of adoption, organizations should consider moving their workloads towards Kubernetes, so that their data services won’t be left behind. Using Red Hat and Partner Operators, Openshift offers both day-1 and day-2 management to your data services.
Thank you for reading this blog post, see ya next time 🙂